Tuesday, March 9, 2010

OSI Layer Refrence Model with required computer protocol concept

Tuesday, March 09, 2010 by ametya · 25 comments
Labels:


  • Why ISO launched OSI reference model ?

When networks first came in to being, computers could typically communicate only with computers from the same manufacturer. To eradicate this problem , International Organization for Standarization (ISO) created a reference model named as Open System Interconnection (OSI) in 1970.

The purpose of OSI model was to help vendors create compatible network devices and software in the form of protocols so that different vendor networks could work with each other.


  • The advantages of OSI model-

Data transferring can be done between two diffferent hosts like in between unix and window pc.

It allows various types of network hardware and software to communicate.


  • What is OSI in real ?

OSI is a set of guidelines which provides a framework while creating and implementing networking standards , devices and schemes.
OSI has 7 different layers, divided in to two group. The top three layers define how the application will communicate with each other and with users. The bottom four layers defines how data is transmitted end to end.
The OSI model is a basic and primary architectural model for networks. It describes how data and network information are communicate from an application on one computer through the network media to an application on another computer.  

7 layers of OSI model

  • The 7 layers of OSI refrence model

Application Layer
Presentation Layer
Session Layer

Transport Layer
Network Layer
Data Link Layer
Physical Layer

Sunday, January 3, 2010

How to make one click shutdown icon ????

Sunday, January 03, 2010 by ametya · 0 comments

You can make a shortcut icon through which you can shutdown your computer in one click .

Do right click on Desktop, go to new and then  shortcut.

shutdown


Then write shutdown –s –t 00 in the box and click next. Here s means shutdown and t means time 00 means 0 second .


name


Now give a name for your shortcut icon.


desktop icon

Your Shortcut icon will be like as shown in figure aside.Now do click this icon to shutdown your computer in just one click.

Similarly, you can make restart and log off icon by typing shutdown –r –t 00 and shutdown – l –t 00 respectively as in above process.

Saturday, January 2, 2010

Windows Live Writer – useful software for blogger to write articles offline

Saturday, January 02, 2010 by ametya · 0 comments
Labels:

If you are a blogger, then Windows Live Writer can be your very useful software to write your posts offline, rather online. It means that after downloading this software, now you can do everything like writing, editing etc. without the connection of internet. You need net just only to publish it, that’s all. What is the process to download Window Live Writer ???? Here are the steps ….

First of all , do download the Windows Live Writer and then run it.  Configure Windows Live Writer dialog box will appear, click the next.


other blog service

You have to select other blog service from the radio button list if you want the live writer for your blog, then.


add a blog account


The clicking of next will ask you user name and password of your blog. 


Tuesday, December 29, 2009

How to add facebook profile in your blog

Tuesday, December 29, 2009 by ametya · 1 comments
Labels:

It's easy to add your facebook profile in your blog

1.  Log on to http://www.facebook.com/ and go to your profile

2. Scroll the bar to the end where you will see Creat a Profile Badge , click that


3. Now you will see the picture as shown below


....choose your blog and do as directed by it


4.  Now you can see the profile in your blog like as shown

5 . You can also edit the facebook badge once you create it .

6. The updated facebook profile with change picture or status will get    automatically updated in your blog too. which is a very nice point of it.

7. You can keep your facebook profile badge in verical or horizontal manner as well as in two column pattern. Such can be done by editing the badge.

Wednesday, December 23, 2009

How to Put Adsense ads inside article or post

Wednesday, December 23, 2009 by ametya · 1 comments
Labels:

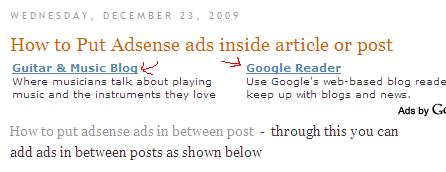
How to put adsense ads in between post  -  through this you can add ads in between posts as shown below


Do you want such ads to be displayed inside your article ??? Then the following steps could help you ....

1. Log on your Adsense Account.

2. Click on AdSense Setup, Get Ads tab will open in default


3. Click on AdSense for Content
                           

4 .Click Continue selecting Text and Image ads ( default ) 
        -  Choose the format and color suitable for your post and do check Preview this AdSense unit to check how does it look in your blog .

5. Click on Continue and again Continue

6. Click on Submit and Get Code

7. Under Your AdSense unit code: You can see some codes

  - press ctrl+A to select all that code and do pasrse that code clicking this link
  - paste the code right below Parse HTML and click  on Parse button
  - You will get parsed code which you have to add on edit html.

8. Click on the Layout and Edit HTML


 -  check the tick mark of Expand Widget Templates

 do remember one thing before doing this save your template by downloading it.

   - search body entry in the code by pressing ctrl+F
   - Just below this coding < div class='post-body entry-content'>
   - do paste the parsed code in precise manner

 9. Now, Save the Template.

10. You can see adsense ads inside your article as shown below for an example.


Is it not working ??? May be it is in the process , do wait some time ..............


Note 1 : Certain time can be taken by adsense unit to pop up the ads in your post. So, do wait some time at least 10 min. to see the result.

Note 2 : Only 3 adsense account can be accessible at one time . So do check that also.


How to put Adsense Ads in between posts

Wednesday, December 23, 2009 by ametya · 0 comments
Labels:


Blogger Platform provides many features in comparision to wordpress. One can get access to its core coding through edit html which is a major intresting part for the blogger from engineering or programming background. Another advantage of using blogger instead of wordpress is that it gives a platform of earning money through the use of google adsense in default .

Adsense provides some ads to your site according to the article posted and whenever reader to click the ads , the blogger gets revenue in terms of some dollor.

To put adsense in between post, do follow the following steps :


  1. Click Layout , Page element then by default will be selected


     3.  In Blog Post Block you can see edit ,click that


     4 . A new window will be poped up where check the tick mark in SHOW ADS  BETWEEN POSTS


    - Do change the font and color of ads according to the background of your post
    - The recommended format is 468 * 15 Horizontal Row.

    5 . Click Save and then view your blog .


The ads will be started to be appeared in between your posts as shown above.


Sunday, December 20, 2009

Know the speed of intenet

Sunday, December 20, 2009 by ametya · 0 comments
Labels:

http://www.speedtest.net/

Speedtest is a site which can be used to know your current speed of net ..